
Today I bring you; (drum roll please.......................) another dessert. But this is not just A dessert, it is THE dessert. I bring you Crack Pie, slightly modified for gluten free enjoyment. Crack Pie is the dessert that all other desserts will now be compared to. For example; a friend may say:"Wow, I had this amazing chocolate cake for my birthday! My husband made the chocolate himself from scratch using organic cocoa beans flown in from South America. It was
soooo amazing!!!" Then you would say; "Was it better than Crack Pie?" Your friend; "no......no it was not."
Just for clarity, Crack Pie derives it name for the addictive nature of this dessert, not because of fissures forming as it bakes. I have never actually tried real crack cocaine, so I can't give you an accurate side by side comparison between Crack Pie and real crack. But here is my breakdown; real crack is a dirty little rock, crack pie is a brown monochromatic mess. I imagine real crack gives you a euphoric high, followed by crushing guilt and self loathing. Crack pie- same. Real crack-illegal, Crack Pie-legal for now. Real crack- need to find shady people to get a fix, Crack Pie- need to go to the grocery store. Enough already, lets make this thing.
I will warn you, if you are faint of heart, the butter and sugar quantities may cause palpitations.
Gluten Free Crack Piefrom Christina Tosi @ Momofuku Milk Bar modified to be GFOat Cookie for the Crust:6 Tbs unsalted butter (room temp)
4 Tbs brown sugar
2 Tbs granulated sugar
1 egg
3/4 cup plus 2 Tbs
GF oats (I use
Bob's Red Mill)
1/2 cup
GF flour mix 1/8 tsp baking powder
1/8 tsp baking soda
heaping 1/4 tsp salt
Crust:Oat cookie- crumbled
3 Tbs unsalted butter- melted
1-1/2 Tbs brown sugar
Filling:
3/4 cup granulated sugar
1/2 brown sugar- packed
1 Tbs non fat dry milk powder
1/4 tsp salt
1/2 cup (1 stick) unsalted butter- melted
6-1/2 Tbs heavy whipping cream
4 large egg yolks
1 tsp vanilla
powdered sugar for dusting
Makes one 9inch diameter pie

Preheat the oven to 350 degrees F. Start by making an oatmeal cookie for the crust. Using a stand mixer, combine 6 Tbs of room temp butter with 4 Tbs of brown sugar and 2 Tbs of white sugar. Mix until light and fluffy, about 2-3 minutes. Next, beat in one large egg.

In a separate bowl, combine the
gluten free oats, 1/2 cup of
gluten free flour mix, 1/8 tsp baking powder, 1/8 tsp baking soda, and a heaping 1/4 tsp of salt. Stir the dry ingredients a little at a time into the mixing bowl with the butter, sugar, and egg. Mix thoroughly.

Line a 9x13 metal baking pan with parchment paper and spray it with nonstick spray. Spread the batter out evenly in the pan. This can be a little tricky because everything wants to slide around and the batter is pretty gooey. Do the best you can, if you have gaps or holes in the batter it's OK, everything will melt together as it bakes. Pop the cookie in the preheated oven for 17-18 minutes or until golden brown. My cookie baked for about 12-13 minutes. Remove the cookie from the oven and allow it to cool completely in the pan on a cooling rack. I mean it, don't sit there and pick at it, I know you'll want to.

When the cookie is completely cool, crumble it with your fingers into a medium sized bowl. Next, add 3 Tbs of melted butter and 1-1/2 Tbs of brown sugar. Mix everything together with your fingers and then press the mixture evenly into a 9inch baking pan, go up the sides as well.

For the filling; in a medium bowl, whisk together 3/4 cup of white sugar, 1/2 cup of packed brown sugar, 1 Tbs of nonfat dry milk powder (you can find this in the baking section of most groceries stores and it's cheap) and 1/4 tsp salt. Add 1 stick of melted butter and whisk until blended. Finally, add 6-1/2 Tbs whipping cream, 4 egg yolks, and 1 tsp of pure vanilla extract. Whisk until well blended.

Pour the filling into the crust. Place the pie dish on a rimmed baking sheet and into a preheated 350 degree F oven for 30 minutes. Reduce the oven temperature to 325 degrees F and continue baking for 15-20 minutes or until the filling is brown in spots and set around the edges but the center should move slightly when shaken gently.

Remove from the oven and allow to cool on a rack for at least 20 minutes. Dust with powdered sugar. Refrigerate any left overs.

Crack Pie is meant to be served cold. However, if you have no will power like me, it may not make it to the refrigerator in one piece. I think this pie is actually served best a little warm. It's not very pretty but trust me, one bite and you'll be hooked. Enjoy!!!
 For the Thai peanut sauce; heat oil in a small sauce pan over medium-low heat, add the garlic and ginger. Cook for about 30 seconds. Add the rest of the sauce ingredients, stir until smooth.
 Simmer the sauce until it begins to thicken. Remove the sauce from the heat and cool to room temperature. This sauce will last in the refrigerator for up to a week if you want to make it in advance.
 For the topping, cut the chicken into bite size pieces, I used 3 boneless skinless chicken breasts. Put the chicken pieces in a bowl, add 2 tsp of gf soy sauce, 1 tsp of honey, and 1/2 tsp cornstarch. Mix thoroughly and let the chicken sit for about 10 minutes at room temperature. Heat a nonstick pan over high heat and cook the chicken until done, stirring frequently.
 Preheat the oven to 375 degrees F. Lightly brush the edges of the naan with olive oil. Next, spread the peanut sauce on the bread, add some cooked chicken and cover with shredded mozzarella. Bake for 5-8 minutes or until the cheese is melted and the edges are golden brown. Remove from the oven and top with fresh mung bean sprouts and cilantro sprigs. Amazingly delicious. Enjoy!!!
 It's best to get your ingredients all together before you start. Whisk the salt and xanthan gum into your gf flour mix and you can add the cocoa powder to the granulated sugar.
 Place a stainless steel bowl over a pot of simmering water (double boiler.) Melt the butter and chocolate together until smooth.
 Take the bowl off the heat and stir in the sugar and cocoa powder. Next, whisk in the vanilla and eggs, one at a time. Finally, stir in the gf flour mix that has the salt and xanthan gum in it.
 Preheat your oven to 350 degrees F. Pour the brownies mix into a lightly greased 8inch X 8inch pan. Bake for 25-30 minutes or until an inserted toothpick comes out mostly clean.
 Allow to cool for a few minutes before serving. Enjoy!!!
 In a stand mixer, whisk together the flour, salt, xanthan gum, minced garlic, and garlic powder. Add 1 lightly beaten egg and the milk.
 In a bowl or Pyrex measuring cup, add the warm water, sugar, and yeast. Proof the yeast for about 3-4 minutes. The mixture should foam up slightly.
 Add the yeast mixture to the dry ingredients and mix with a dough hook until thoroughly combined.
 Lay parchment paper over a baking sheet or cutting board and lightly dust with gf flour. Use your hands to divide the dough evenly into four pieces. Lightly flour your hands and press the dough into four flat rounds a bit larger than your hands. Cover the pressed dough with a clean towel and place in a warm area to rise for about 20-30 minutes. The dough will not rise dramatically.
 Next, preheat a heavy skillet, I used cast iron, add 1/2-1 Tbs of butter to the skillet. Fry your naan bread on each side for 3-4 minutes per side. Add a little more butter to the skillet and repeat with the next piece of bread. Finally, take all the cooked naan and wrap it in foil. Place the bread in a warm oven (250-275 degrees F) for about 4-5 minutes. The steam inside the foil will add a nice chewiness to the naan. Now the combination of the naan, lamb, and tzatziki will have your family carting you around the house on their shoulders singing your praises. I'm not joking, it's that good. Enjoy!!!
 I used a 1 pound lamb steak and 1 pound of chicken breasts for my kebabs. Cut the meat into roughly 2 inch cubes.
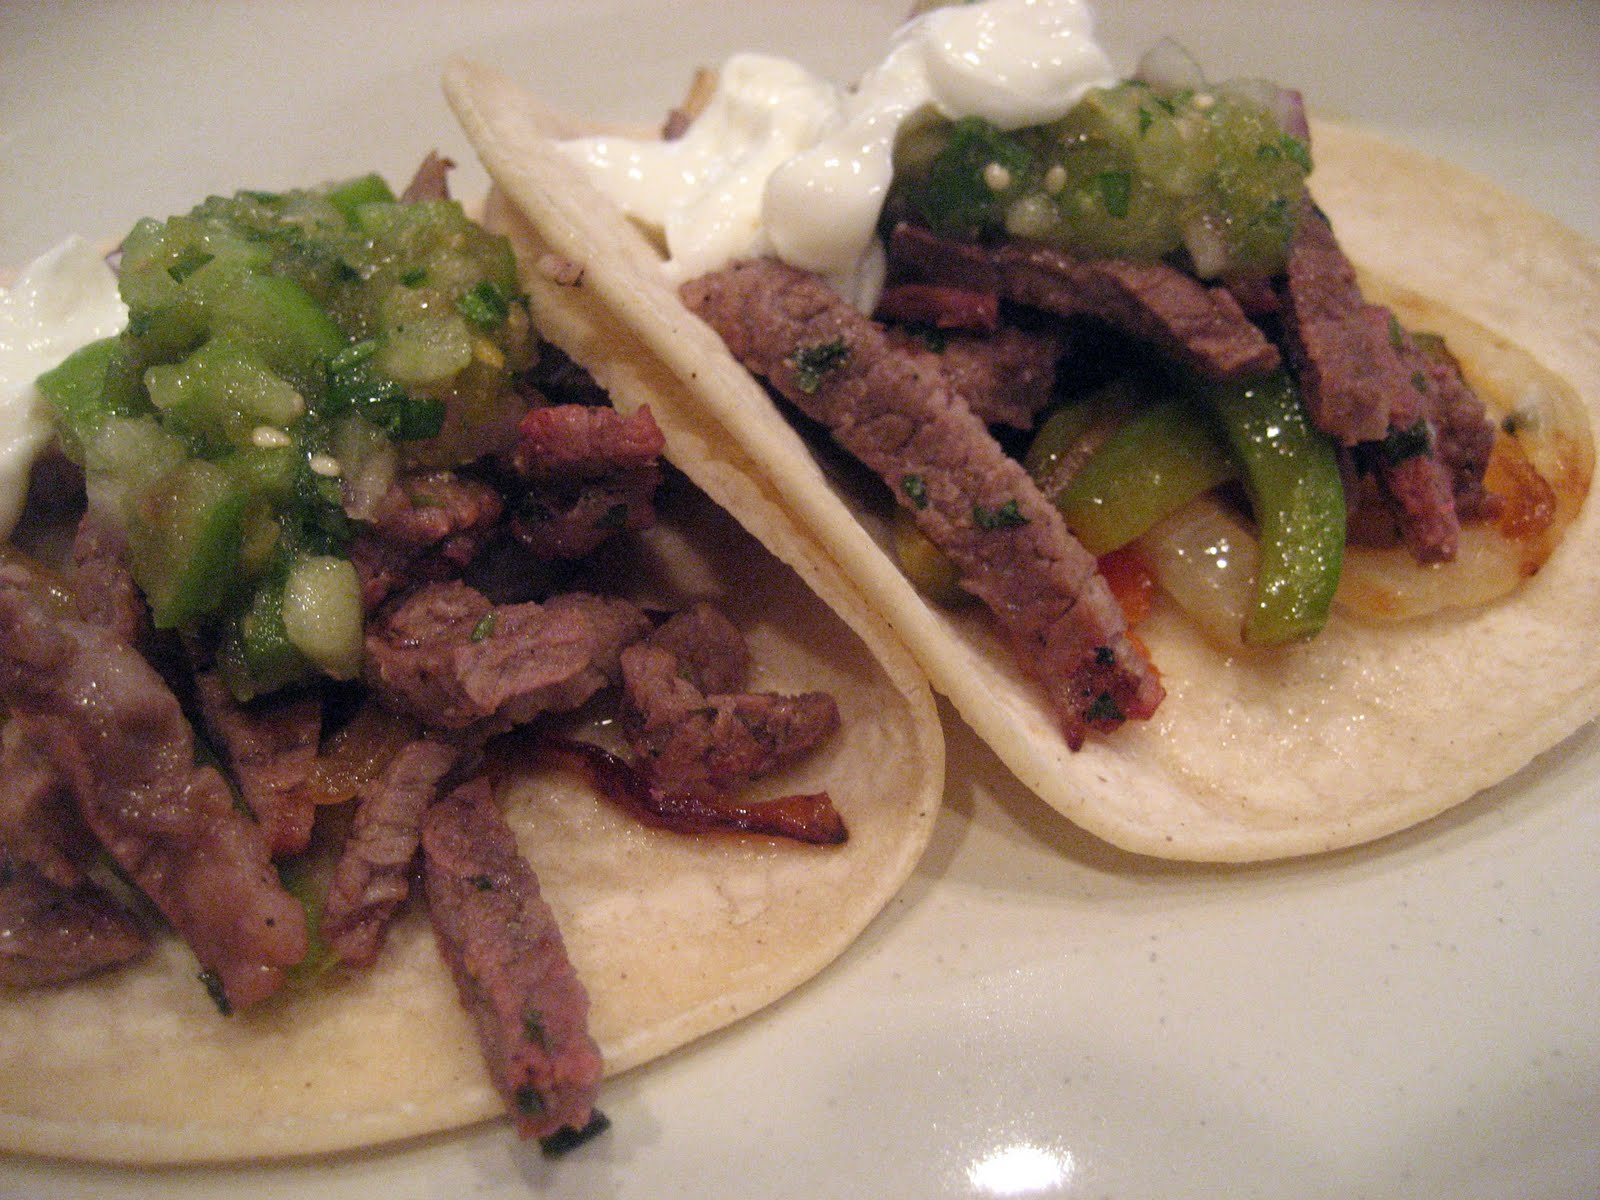
 Place the meat in a medium bowl and cover with marinade. Reserve some of the marinade for the vegetables. Allow the meat to marinade for at least 2-3 hours covered in the refrigerator. Cube up some of your favorite vegetables; I used green and red bell peppers, onion, and zucchini.
 Preheat your grill. I like to make kebabs with all vegetables or all meat on the skewer for easier cooking since the meat takes a little longer to cook than the vegetables. I cooked the meat kebabs for about 6-7 minutes, flipped them over once and cooked them for another 6-7 minutes. Before you put the vegetables on the grill, give them a quick brushing with the reserved marinade. Cook the vegetables for about 4 minutes per side.
  Combine all the ingredients in a medium bowl.
 Serve your kebabs with the tzatziki sauce on the side to dip the meat in. The combination of the cool fresh tzatziki and the rich marinated lamb is out of this world. Enjoy!!!

 Start by lightly toasting cumin seeds until fragrant. Grind the cooled seeds into a powder. You could also use powered cumin if you don't have whole seeds.
 Next, in a large bowl, combine the rest of the marinade ingredients.
 Add the carne asada meat to the bowl and thoroughly coat each piece with marinade. Cover and refrigerate for at least 1 hour and up to 4-5 hours.

 My daughter had a great time playing in the water and hanging out with her cousin.
 My wife's birthday was a few days ago and since I let off with a cake post, I thought I would start back up with one. I made a nice little lemon cake by following one of Martha Stewart's jailhouse recipes, with a few alterations. It was delicious. There was a nice balance of sweet and tart from the lemons.
 Start by making the
  Next, cream the butter and sugar together. Beat in the eggs and yolks. Add the 2 Tbs of lemon juice to the buttermilk. Alternate mixing in the buttermilk and the flour mix until thoroughly combined.
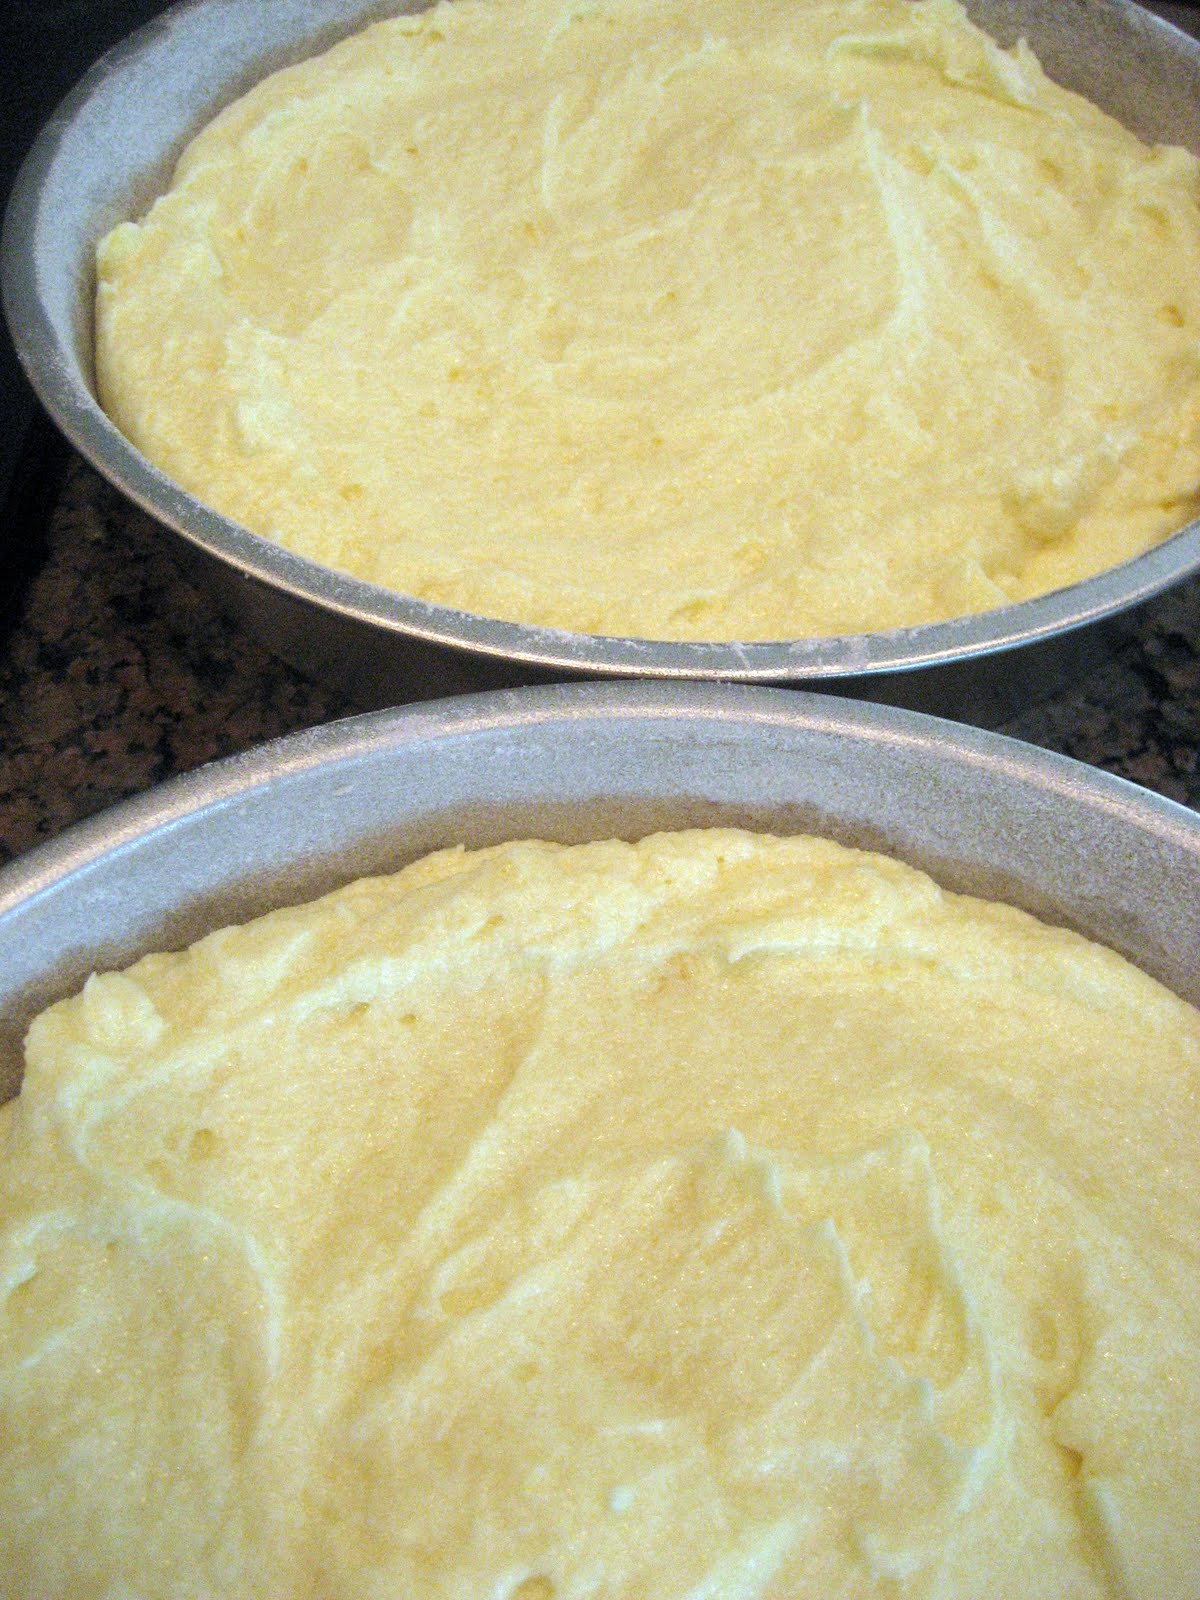


